Picture this: you’re in a kitchen that smells like butter and sugar, the timer on your phone is set to 30 minutes, and the oven door is open with a faint glow. I was halfway through a batch of plain chocolate chip cookies when the door burst open and a friend shouted, “I need something that’s sweet, butterscotch‑y, and totally unforgettable.” I stared at the empty counter, the cookie dough in the bowl, and realized I had the perfect opportunity to turn a simple cookie into a show‑stopping treat. That moment was the spark that lit the fire for the Butterscotch Chocolate Chip Co recipe.
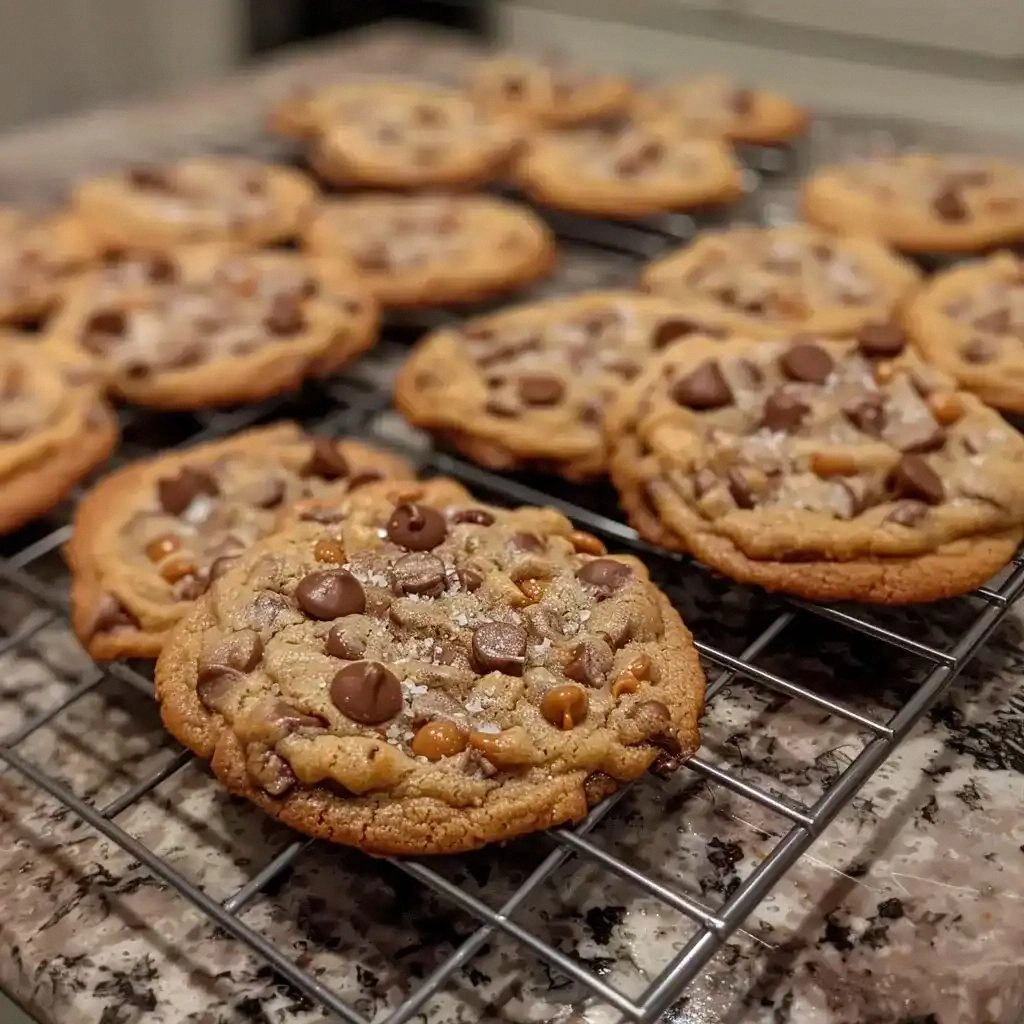
It’s not just another cookie recipe. It’s a symphony of textures: crisp, crackly edges that give way to a chewy, gooey center, all wrapped in a buttery crust that melts in your mouth. The aroma is a warm, caramel‑laden invitation that makes the whole kitchen feel like a bakery on a sunny afternoon. When you bite into one, the butterscotch chips release a buttery caramel note, while the semi‑sweet chocolate chips add a deep, bittersweet bite. The combination feels like a hug for your taste buds—sweet, slightly salty, and utterly comforting.
I dare you to taste this and not go back for seconds. The secret? A blend of brown and white sugar that creates a depth of flavor you won’t find in the standard recipe. A dash of vanilla that ties everything together. And a precise balance of baking soda and baking powder that ensures the cookies rise just enough to stay chewy, yet still crisp around the edges. That’s the difference between a cookie that falls flat and one that feels like a cloud.
Most recipes get this completely wrong, but here’s what actually works: keep the butter soft enough to cream, fold in the sugars slowly, and let the dough rest for ten minutes before baking. That brief pause lets the flour hydrate and the gluten relax, giving you a tender crumb. I’ll be honest—I ate half the batch before anyone else got to try it. And now, I’m sharing the exact steps so you can replicate that same magic every time. Let me walk you through every single step — by the end, you’ll wonder how you ever made it any other way.
What Makes This Version Stand Out
- Flavor: The dual-sugar blend gives a caramel depth that elevates the butterscotch chips, creating a rich, buttery sweetness that lingers on the palate.
- Texture: A carefully balanced leavening duo of baking soda and baking powder produces a cookie that is crispy on the outside yet chewy on the inside, with a satisfying snap when bitten.
- Ingredient Quality: Using high‑grade unsalted butter and premium chocolate chips ensures each bite is silky and full of flavor, avoiding the bitterness of cheaper alternatives.
- Versatility: The recipe scales beautifully—whether you’re baking for a family gathering or a potluck, the proportions hold up perfectly.
- Make‑Ahead Potential: The dough can be chilled for up to 48 hours, allowing you to bake on short notice while still achieving optimal flavor and texture.
- Crowd Reaction: Friends who’ve tried it say the cookies are “the best you’ll ever make at home,” and they keep coming back for seconds.
- Ease of Execution: No fancy equipment required—just a mixing bowl, measuring cups, and a reliable oven.
- Visual Appeal: The golden crust with visible chips makes for a mouth‑watering presentation that’s Instagram‑ready.
Inside the Ingredient List
The Flavor Base
At the heart of any cookie is the flavor base—here it’s a trio of sweeteners that work together to create a caramelized sweetness. The 1 cup of granulated sugar provides the necessary structure and browning, while the 1 cup of packed brown sugar brings a molasses undertone that enriches the butterscotch chips. Together, they form a sweet canvas that supports the buttery butter and vanilla.
Skipping the brown sugar will make the cookies taste flat and one‑dimensional. If you’re aiming for a lower calorie version, you can replace half the granulated sugar with a natural sweetener like honey or maple syrup, but be prepared for a slight change in texture.
The Texture Crew
The 2 ½ cups of all‑purpose flour are the structural backbone. They absorb the wet ingredients and provide the dough with body. The 1 teaspoon of baking soda and ½ teaspoon of baking powder are the leavening agents that create lift and help the cookies spread just enough for a crisp edge. The ½ teaspoon of salt balances the sweetness and enhances the flavors of the butter and chocolate.
Choosing a low‑protein flour can yield a more tender cookie, but it may also result in a softer crumb that doesn’t hold its shape as well. For a chewier texture, keep the flour as specified and avoid overmixing after adding the dry ingredients.
The Unexpected Star
Butterscotch chips are the star that sets this recipe apart. They’re not just sweet; they carry a buttery caramel flavor that pairs beautifully with chocolate. The 1 cup of butterscotch chips is a deliberate choice—enough to make each bite a burst of caramel, yet not so much that it overwhelms the chocolate.
If you can’t find butterscotch chips, you can create a quick substitute by mixing equal parts melted butter and brown sugar, then letting the mixture cool and solidify into small chips. This DIY version will still give you that buttery caramel note.
The Final Flourish
The semi‑sweet chocolate chips add depth and a hint of bitterness that balances the overall sweetness. They also create a delightful contrast in texture, with the melt‑in‑your‑mouth chocolate melting slightly while the butterscotch chips stay firm. The 1 cup of chocolate chips ensures each cookie is loaded with chocolatey goodness.
For a richer experience, you can swap the semi‑sweet chips for dark chocolate chips, but be aware that the chocolate will have a more pronounced bitterness that may need to be balanced with a touch more brown sugar.
Everything's prepped? Good. Let's get into the real action…
The Method — Step by Step
- Step 1: Preheat your oven to 375°F (190°C). Line a baking sheet with parchment paper to prevent sticking. This temperature ensures the cookies bake evenly, creating that perfect golden edge without burning the centers. Keep the oven rack in the middle for optimal airflow.
- Step 2: In a large mixing bowl, combine 1 cup of softened butter, 1 cup of granulated sugar, and 1 cup of packed brown sugar. Use an electric mixer on medium speed until the mixture is light and fluffy, about 2–3 minutes. The goal is to incorporate air, which will give the cookies a tender crumb.
- Step 3: Crack 2 large eggs into a separate bowl and add 1 teaspoon of vanilla extract. Whisk until fully combined. Then pour the egg mixture into the butter and sugar, mixing on low speed until just combined. Overmixing here can cause the cookies to become tough.
- Step 4: In a separate bowl, whisk together 2 ½ cups of all‑purpose flour, 1 teaspoon of baking soda, ½ teaspoon of baking powder, and ½ teaspoon of salt. This dry mix is crucial for the cookie’s rise and structure. Gently fold the dry ingredients into the wet mixture until just incorporated; the dough should look slightly lumpy but cohesive.
- Step 5: Fold in 1 cup of butterscotch chips and 1 cup of semi‑sweet chocolate chips. The chips should be evenly distributed throughout the dough. The chocolate will melt slightly during baking, creating pockets of molten flavor.
- Step 6: Drop rounded tablespoons of dough onto the prepared baking sheet, spacing them about 2 inches apart. The dough will spread as it bakes, so keep enough distance to avoid merging.
- Step 7: Bake for 10–12 minutes, or until the edges are golden brown and the centers look set but still soft. The cookies should emit a buttery, caramel aroma that makes the kitchen feel like a bakery. Avoid opening the oven door too early, as this can cause the cookies to sink.
- Step 8: Remove the sheet from the oven and let the cookies cool for 5 minutes on the pan. This rest period allows the structure to set, preventing them from breaking apart when moved.
- Step 9: Store the cooled cookies in an airtight container at room temperature for up to 5 days. For longer freshness, place them in the refrigerator; they’ll stay crisp for up to 2 weeks.
- Step 10: If you want to revive them after refrigeration, microwave on low for 10 seconds or warm in a 350°F oven for 5 minutes. This will restore their chewy center and buttery flavor.
That's it — you did it. But hold on, I've got a few more tricks that'll take this to another level…
Insider Tricks for Flawless Results
The Temperature Rule Nobody Follows
Many bakers think any 375°F oven will do. The truth is, oven temperature fluctuates; a calibrated thermometer will help you maintain a consistent 375°F. Even a 5‑degree difference can alter the cookie’s rise and texture, so invest in a good thermometer if you bake often.
Why Your Nose Knows Best
During baking, the scent is a reliable indicator of doneness. When the cookies emit a rich, buttery caramel aroma, they’re almost ready. If the smell is faint or you can still smell raw butter, give them a minute more. Trust your nose over the timer for the perfect bite.
The 5‑Minute Rest That Changes Everything
Letting the cookies sit on the pan for 5 minutes after baking sets the structure. It prevents the cookies from breaking apart when you transfer them to the wire rack and also allows the sugars to crystallize, giving the chewy center its signature texture.
Keep It Cool, Keep It Fresh
After the cookies have cooled, wrap them loosely in parchment paper before placing them in an airtight container. The parchment paper absorbs excess moisture and keeps the cookies from becoming soggy.
Don’t Skimp on the Butter
Butter is the flavor engine of this cookie. Using a high‑quality, unsalted butter with a 80% fat content ensures a rich, buttery taste that carries the butterscotch chips. If you use margarine or a low‑fat butter, the cookies will taste flat and lack depth.
Creative Twists and Variations
This recipe is a playground. Here are some of my favorite ways to switch things up:
Nutty Butterscotch Crunch
Add ½ cup of chopped pecans or walnuts to the dough. The nuts provide a satisfying crunch and a nutty flavor that complements the caramel notes.
Spiced Ginger Twist
Stir in ½ teaspoon of ground ginger and a pinch of cayenne pepper. The subtle heat and warm spice bring a new dimension to the sweet base.
Salted Caramel Swirl
Drizzle a thin layer of salted caramel sauce over the dough before baking. The caramel adds a silky glaze and a salty finish.
Chocolate‑Butterscotch Ganache
Melt equal parts dark chocolate and butterscotch chips into a ganache. Spread it over the cooled cookies for a decadent finish.
Vegan Version
Replace the butter with coconut oil, use flaxseed eggs, and swap the dairy chocolate chips for dairy‑free chocolate chips. The result is a vegan cookie that still delivers on flavor.
Low‑Carb Takeaway
Use a low‑carb sweetener like erythritol and almond flour in place of all‑purpose flour. The cookies will have a different texture but still maintain the butterscotch and chocolate essence.
Storing and Bringing It Back to Life
Fridge Storage
Place the cooled cookies in an airtight container at room temperature for up to 5 days. For a firmer texture, store them in the refrigerator for up to 2 weeks. The cool environment slows down the moisture loss, keeping the cookies crisp.
Freezer Friendly
Wrap the cookies individually in parchment paper and then place them in a freezer‑safe bag. They stay fresh for up to 3 months. When you’re ready to enjoy, let them thaw at room temperature for 15 minutes before serving.
Best Reheating Method
To revive frozen or refrigerated cookies, place them on a baking sheet and warm them in a 350°F oven for 5 minutes. Add a tiny splash of water to the container before reheating to create steam, which restores the chewy center and keeps the cookie from drying out.