I was in the middle of a cookie fiasco when I realized I had a bag of Easter M&M’s left over from last week. The kitchen smelled of butter and sugar, but the batter looked like a sad, flat pancake. I dared myself to turn that disappointment into a triumph by adding those colorful candies to a classic chocolate chip base. The result was a cookie that burst with rainbow crunch and a buttery, chewy center that made my taste buds do a happy dance. I swear, if you think cookie baking is a science, this is the proof that a little whimsy can turn science into art.
Picture the oven door swinging open, releasing a wave of golden, caramelized edges that crackle like tiny fireworks. The sound of the dough settling into the pan is a soft, comforting thud that signals everything is on track. The scent of toasted sugar and vanilla drifts through the air, mingling with the faint, sugary sting of the M&M’s. You can almost taste the first bite before it even lands on your tongue—a sweet, chocolatey explosion balanced by a hint of salt. That instant moment when the timer buzzes is the sweetest soundtrack to your baking journey.
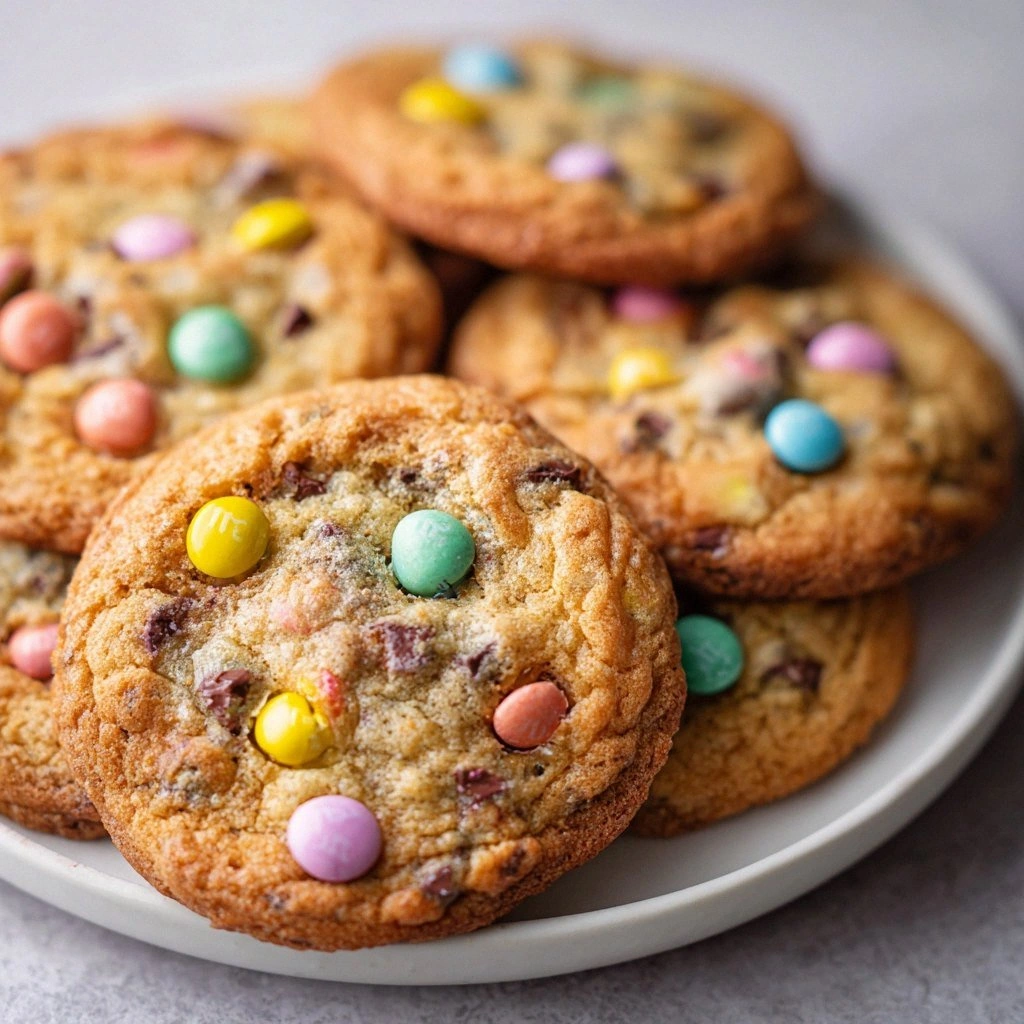
What makes this version stand out is that it doesn't just add color; it layers textures and flavors in a way that makes every bite a mini adventure. The buttery base creates a tender crumb that holds the chocolate chips like a gentle hug, while the M&M’s provide a satisfying pop that breaks the silence of the melt. The recipe uses a precise ratio of granulated to brown sugar to achieve the perfect balance of crisp edges and chewy centers. It also incorporates a small amount of baking soda to lift the dough just enough so it spreads but still retains that classic cookie thickness. The result is a cookie that feels both nostalgic and brand-new, a treat that you can't resist sharing.
I dare you to taste this and not go back for seconds. If you've ever struggled with cookies that come out too hard or too flat, this recipe is the antidote you need. Most recipes get this completely wrong by overbaking or using too much flour, but here, the magic lies in the subtle timing and the right mix of sugars. Picture yourself pulling this out of the oven, the whole kitchen smelling incredible, and handing the first cookie to a guest who says, 'I need the recipe.' By the end, you'll wonder how you ever made it any other way.
What Makes This Version Stand Out
- Taste: The blend of sweet, salty, and chocolatey flavors creates a symphony that lingers on the palate. The M&M’s add a playful crunch that contrasts with the chewy center, while the chocolate chips provide a deep, rich finish. This combination turns an ordinary cookie into a memorable bite that feels like a holiday celebration in every mouthful.
- Texture: The dough is engineered for that perfect chew—soft in the middle and crisp at the edges. The careful balance of granulated and brown sugar gives the cookies a slight crunch that snaps when you bite, while the butter keeps them tender. The result is a cookie that feels like a chewy caramel bar wrapped in chocolate.
- Simplicity: With only ten ingredients and a straightforward method, you can whip up these cookies in under an hour. No fancy equipment is required—just a mixing bowl, a whisk, and a baking sheet. The recipe’s clarity makes it ideal for novice bakers or anyone looking for a quick, satisfying treat.
- Uniqueness: The inclusion of Easter M&M’s is a bold twist that adds color, crunch, and a pop of candy flavor. It transforms a standard chocolate chip cookie into a festive masterpiece that stands out at any gathering. The visual appeal alone is enough to make guests line up for the first bite.
- Crowd Reaction: Friends and family rave about the rainbow surprise inside each cookie. The moment someone bites into a cookie and hears the M&M crunch is a shared giggle that spreads through the room. It's the kind of dessert that becomes the highlight of any party.
- Make‑ahead Potential: Once baked, these cookies keep their texture and flavor for up to a week when stored properly. They also freeze well, so you can bake a batch ahead and have fresh treats ready for any occasion. This makes the recipe a practical choice for busy households.
Inside the Ingredient List
The Flavor Base
Butter is the heart of your cookies, adding richness and moisture. It helps create that delightful chewy texture we all love. Make sure it’s softened to room temperature for easy creaming. Granulated sugar contributes sweetness and aids in browning, giving your cookies those beautiful golden edges. Brown sugar adds depth and a subtle molasses note that balances the sweetness.
The Texture Crew
Eggs act as a binder that holds the dough together and contributes to the chewy texture. They also help create a light, airy structure when whisked properly. All-purpose flour provides the necessary structure; be sure to measure it correctly to avoid dry cookies—too much flour can lead to a crumbly texture. Baking soda is a leavening agent that helps the cookies rise and achieve that light, airy texture. Salt is a pinch of salt is crucial for balancing sweetness and enhancing the flavors of the other ingredients.
The Unexpected Star
Chocolate chips add rich chocolate flavor and melty goodness. Feel free to use semi-sweet, dark, or even milk chocolate chips based on your preference! The chips melt into pockets of chocolate that burst with each bite, adding a decadent layer of flavor. They also help balance the sweetness of the sugars, creating a harmonious taste profile.
The Final Flourish
Easter M&M’s not only provide a pop of color and crunch, but they also add a fun sweetness that makes these cookies perfect for the holiday season. Their vibrant hues are sure to brighten up any dessert table! The candies add a playful texture that contrasts beautifully with the chewy dough. If you’re looking for a festive twist, these M&M’s are the perfect finishing touch.
Everything's prepped? Good. Let's get into the real action...
The Method — Step by Step
- Preheat your oven to 375°F (190°C) and line two baking sheets with parchment paper. Let the sheets sit at room temperature while you prepare the dough so they’re warm and ready to receive the batter. This step ensures even baking and prevents the cookies from sticking. When the oven is ready, set a timer for 12 minutes for the first batch. The aroma that begins to fill the kitchen is a sign that everything is moving in the right direction.
- In a large bowl, cream together 1 cup of softened butter, 3/4 cup of granulated sugar, and 3/4 cup of packed brown sugar until the mixture is light and fluffy. Use a stand mixer or a hand mixer on medium speed; the goal is to incorporate air for a tender crumb. The mixture should feel silky and slightly pale, indicating that the sugars have fully dissolved. This creaming step is the foundation of the cookie’s texture. Keep mixing until the mixture is smooth and the butter is fully incorporated.
- Beat in 2 large eggs, one at a time, followed by 1 teaspoon of vanilla extract. Ensure each egg is fully incorporated before adding the next; this prevents curdling and creates a smooth batter. The vanilla adds warmth and depth, complementing the chocolate and candy. As you whisk, notice the mixture thickening slightly, signaling that the wet ingredients are binding well. Let the batter rest for a minute to allow the flavors to meld.
- Sift together 2 1/4 cups of all-purpose flour, 1 teaspoon of baking soda, and 1 teaspoon of salt in a separate bowl. Mixing the dry ingredients separately ensures even distribution and prevents lumps. Slowly add the dry mix to the wet batter, stirring until just combined; overmixing can toughen the cookies. The dough should be thick but pliable, ready to be portioned. If the dough feels too sticky, chill it for 10 minutes before scooping.
- Fold in 2 cups of chocolate chips and 1 cup of Easter M&M’s with a spatula, ensuring an even distribution of the candies. The chocolate chips should be tucked into the dough, while the M&M’s should be scattered throughout for a colorful burst. This step is where the magic happens—the anticipation of the candy crunch builds with every stir. The dough will look slightly uneven, but that’s exactly what you want for a rustic, homemade feel.
- Drop rounded tablespoons of dough onto the prepared baking sheets, spacing them 2 inches apart. Use a cookie scoop or a tablespoon for consistency. The dough will spread slightly during baking, so give them enough room. Watch the edges lift and turn golden; this is your cue that they’re baking correctly. The dough should look like a small, golden dome.
- Bake for 12 to 14 minutes, or until the edges are golden and the centers look set but still soft. Let the cookies cool on the pan for 5 minutes before transferring them to a wire rack. This resting period allows the cookies to finish cooking and firm up, preventing them from breaking apart. The aroma of freshly baked chocolate and candy will fill the house, making the wait almost unbearable. Once cool, the cookies are ready to devour or store.
That's it — you did it. But hold on, I've got a few more tricks that'll take this to another level. These little adjustments can turn a good cookie into an unforgettable experience.
Insider Tricks for Flawless Results
The Temperature Rule Nobody Follows
Baking at the right temperature is key to achieving that perfect balance between a crisp edge and a chewy center. Many people bake at 350°F, but this recipe calls for 375°F to give the cookies a slightly firmer bite. If your oven runs hot, lower the temperature by 25°F and increase the baking time by a minute or two. The goal is to keep the cookies from spreading too much while still allowing the chocolate to melt just right.
Why Your Nose Knows Best
Trust your nose; it’s the best judge of doneness. When the cookies start to emit a warm, caramelized aroma, they’re nearly ready. If the smell is too sweet or too raw, give them an extra minute. A well-baked cookie will have a faint nutty scent that signals the sugars are caramelized and the butter is fully cooked.
The 5-Minute Rest That Changes Everything
After removing the cookies from the oven, let them rest on the baking sheet for 5 minutes. This brief pause allows the structure to set, preventing the cookies from breaking when you transfer them to a wire rack. The rest also helps the chocolate chips set properly, ensuring they don’t ooze out when you bite.
Use a Silicone Baking Mat
A silicone baking mat keeps the cookies from sticking and ensures even heat distribution. It also makes cleanup a breeze, saving you time for the next baking session. The mat’s non-stick surface prevents the cookies from sinking into the sheet, preserving their shape.
Cool on a Wire Rack, Not a Plate
Cooling on a wire rack allows air to circulate around each cookie, preventing a soggy bottom. The airflow also helps the cookies firm up, giving them a pleasant bite. If you cool them on a plate, the steam gets trapped and can make the cookies chewy instead of crisp.
Creative Twists and Variations
Nutty Surprise
Swap half of the chocolate chips for chopped almonds or walnuts for a nutty crunch. The nuts add a savory depth that pairs wonderfully with the sweet M&M’s. This variation is perfect for guests who love a little extra texture. The nuts also add a healthy protein boost to the cookies.
Minty Freshness
Add a teaspoon of peppermint extract to the batter for a cool, refreshing twist. The mint pairs beautifully with the chocolate, creating a classic candy bar flavor. It’s a great option for spring and summer parties where a cool note is welcome. The mint also helps balance the sweetness of the M&M’s.
Spiced Holiday
Incorporate a pinch of cinnamon, nutmeg, and a splash of orange zest for a warm, holiday-inspired cookie. The spices add depth and a comforting aroma that makes the cookies feel cozy. This version is ideal for holiday gatherings where a spiced treat is always appreciated. The orange zest adds a bright, citrusy finish.
Dark Chocolate Lover
Replace the chocolate chips with dark chocolate chunks for a richer, slightly bitter bite. Dark chocolate enhances the chocolate flavor while reducing the sweetness, making it a sophisticated choice. The M&M’s still provide the playful crunch, balancing the boldness of the dark chocolate. This version is great for adult gatherings or when you want a more refined cookie.
Gluten-Free Edition
Use a gluten-free all-purpose blend in place of regular flour to keep the cookies safe for gluten-sensitive guests. The texture may be slightly denser, but the flavor remains unchanged. Pair it with the same sweet and crunchy elements for a familiar yet inclusive treat. The gluten-free version still holds up well in storage and reheating.
Cheesecake Cookie
Fold in a handful of shredded cream cheese with the chocolate chips for a tangy, cheesecake-like flavor. The cream cheese adds a creamy, slightly tangy note that contrasts beautifully with the sweetness of the M&M’s. This variation is a hit with guests who love a little extra indulgence. The cookies will have a slightly denser crumb, but the flavor payoff is worth it.
Storing and Bringing It Back to Life
Fridge Storage
Store cooled cookies in an airtight container at room temperature for up to five days. The airtight seal prevents the cookies from drying out and maintains their chewy texture. If you notice the cookies becoming too soft, add a slice of bread to the container; the bread will absorb excess moisture.
Freezer Friendly
Wrap individual cookies in parchment paper and place them in a freezer-safe bag. Store for up to three months without compromising flavor or texture. When ready to eat, let the cookies thaw at room temperature for 10 minutes before reheating. Freezing preserves the M&M’s crunch and chocolate flavor.
Best Reheating Method
Reheat frozen cookies in a 350°F oven for 8 minutes, or until they’re warm and slightly crisp on the edges. For fresh cookies that need a quick refresh, microwave on medium for 15 seconds; this will soften the center without melting the chocolate. Add a tiny splash of water before reheating; it steams the cookies back to a perfect, soft bite.