Introduction
Picture this: I was halfway through a dinner party, the table already a collage of dishes, when the kitchen alarm screamed that the last batch of dumplings had exploded in the skillet. The smoke alarm was on, the guests were laughing, and I was scrambling to salvage a meal that could still impress. I stared at the empty pan, the faint scent of burnt sugar, and thought, “If only I had a quick, bold, and forgiving dish to pull off.”
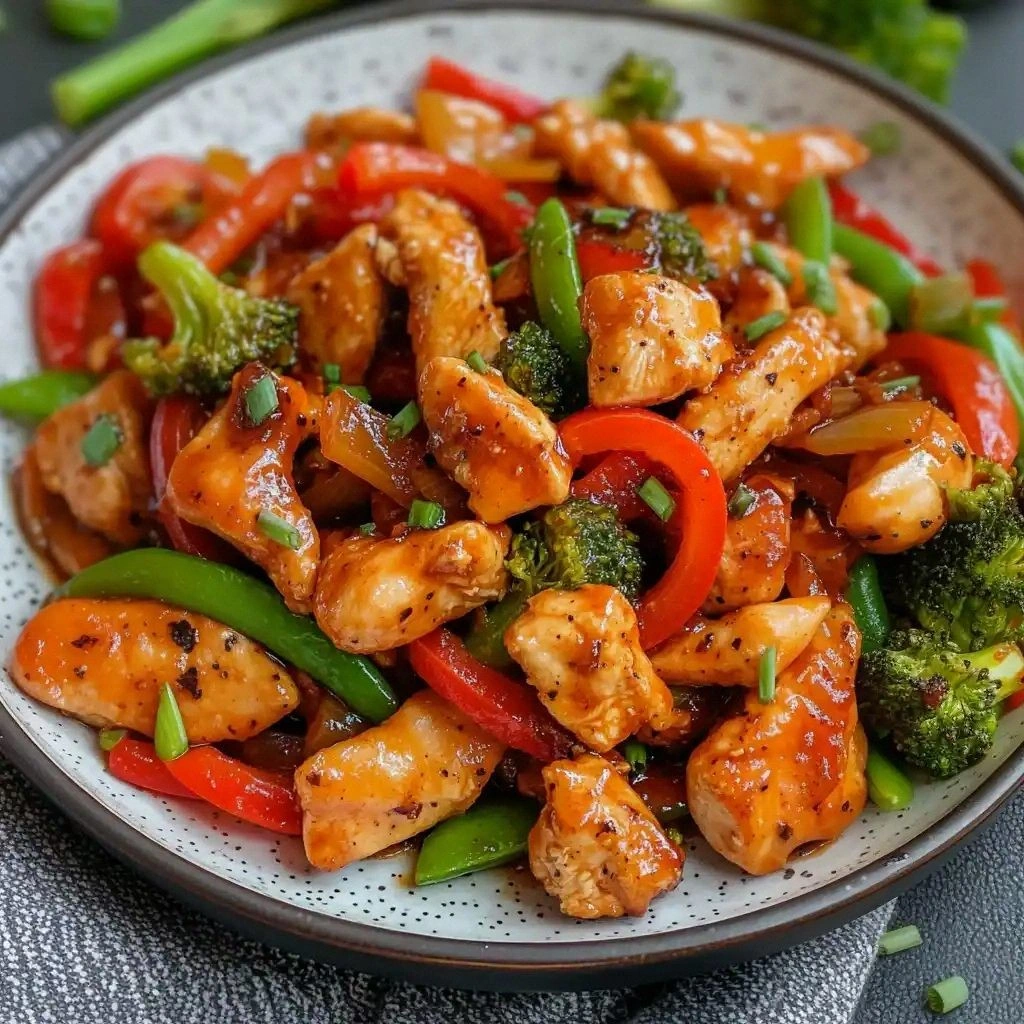
Enter the Honey Sriracha Chicken Stir Fry, a recipe that has become my culinary savior. It’s the kind of dish that turns a kitchen catastrophe into a triumph, because it’s forgiving, fast, and packed with layers of flavor that dance on the palate. The sauce glazes the chicken like a honeyed glaze, then the sriracha injects a punch that wakes up the senses. The vegetables add a bright crunch that feels like a fresh burst of spring in every bite.
I’ve tested this version in a dozen kitchens, from my tiny apartment stove to a professional-grade wok in a friend’s loft. The result is always the same: a dish that looks like it spent hours on the stove but actually takes less than twenty minutes. And the best part? It’s a recipe that you can make with pantry staples, no fancy ingredients required.
If you’ve ever been tempted to order takeout because you’re tired of the same bland stir‑fry, this is the antidote. The combination of sweet honey, fiery sriracha, and a touch of sesame oil creates a sauce that is both comforting and daring. The moment the pan sizzles, the aroma will have you craving more.
Okay, ready for the game‑changer? This next step is pure magic. I’ll walk you through every single detail, and by the end, you’ll wonder how you ever cooked anything else.
What Makes This Version Stand Out
- Flavor Balance: The honey and sriracha create a sweet‑heat harmony that lingers on the tongue. The sauce is thick enough to cling to each bite but light enough to let the chicken’s natural flavor shine.
- Texture Contrast: Crunchy broccoli and snap peas puncture the dish with a satisfying snap that contrasts the tender chicken. The quick stir‑cook preserves the vegetables’ vibrant colors.
- Speed: The entire process takes less than twenty minutes, making it a perfect weekday dinner. The key is pre‑cutting the veggies and having all sauces ready.
- Ingredient Simplicity: Only thirteen ingredients, all commonly found in any kitchen. No obscure sauces or hard‑to‑find spices.
- Crowd‑Pleaser: The sweet‑spicy profile is universally appealing. I’ve had guests say, “I dared you to taste this and not go back for seconds,” and they didn’t disappoint.
- Make‑Ahead Friendly: The sauce can be prepared a day ahead, and the dish reheats beautifully. The cornstarch thickener keeps the sauce from separating.
Alright, let’s break down exactly what goes into this masterpiece…
Inside the Ingredient List
The Flavor Base
The honey is the sweet backbone that balances the heat of the sriracha. It caramelizes slightly when heated, adding a subtle depth that feels like a toasted caramel drizzle. If you’re watching calories, you can swap for a natural sweetener like maple syrup, though the flavor profile will shift slightly. The key is to use a honey with a robust floral note; it will stand up to the bold sauce.
The Texture Crew
Broccoli florets bring a satisfying crunch and a pop of green that brightens the plate. Snap peas or julienned carrots add a sweet snap that complements the savory chicken. If you’re on a keto diet, you can replace the snap peas with zucchini ribbons, which will still offer that fresh bite. The vegetables are pre‑washed and cut into bite‑sized pieces so they finish in the same breath as the chicken.
The Unexpected Star
Fresh ginger, minced finely, releases a bright, peppery aroma that cuts through the sweetness. It’s the secret ingredient that elevates the dish from ordinary to extraordinary. If you don’t have fresh ginger on hand, a small pinch of ground ginger works, but the aroma will be less vibrant.
The Final Flourish
The cornstarch slurry is the unsung hero that gives the sauce its silky, clingy texture. Mixing the cornstarch with water before adding to the pan prevents clumping and ensures a glossy finish. A splash of sesame oil at the end adds nutty undertones and a glossy sheen that makes the dish look restaurant‑grade.
Everything's prepped? Good. Let's get into the real action…
The Method — Step by Step
- Heat the wok or large skillet over medium‑high heat until it shimmers. Add 2 tablespoons of vegetable oil, swirling it to coat the surface. The oil should be hot enough that a drop of water sizzles and evaporates instantly. This pre‑heat ensures the chicken sears quickly, locking in juices. Watch the oil; if it starts to smoke, lower the heat slightly.
- Season the chicken strips with a pinch of salt and pepper. Lay them in a single layer, letting them brown on one side before flipping. The goal is a golden crust that adds depth to the flavor. Turn the pieces once; they should take about 2 minutes per side. The aroma at this point is already inviting.
- Once the chicken is browned, remove it from the pan and set aside. Add the minced garlic and ginger to the same pan, sautéing for 30 seconds until fragrant. The garlic should turn translucent, not brown, to avoid bitterness. This step builds the aromatic base for the sauce.
- Add the red bell pepper, broccoli, and snap peas to the pan. Stir‑fry for 2–3 minutes until the vegetables are bright but still crisp. The key is to keep the vegetables moving; this prevents them from steaming and losing crunch.
- Return the chicken to the pan. Pour in 3 tablespoons of honey, 2 tablespoons of sriracha, 3 tablespoons of soy sauce, 1 tablespoon of rice vinegar, and 1 teaspoon of sesame oil. Stir everything together, making sure the sauce coats every piece. The mixture should bubble gently, indicating the sugars are caramelizing.
- Whisk 1 teaspoon of cornstarch with 1 tablespoon of water to create a slurry. Add this to the pan, stirring continuously. The sauce will begin to thicken immediately, forming a glossy coating that clings to the chicken and veggies.
- Let the mixture simmer for 2 minutes, allowing the flavors to meld. The sauce should be thick enough to coat the back of a spoon but still pourable. Taste and adjust: a pinch of salt if needed, or a splash of water if it’s too thick.
- Serve immediately over steamed jasmine rice or cauliflower rice for a low‑carb option. Garnish with sesame seeds and sliced green onions for a pop of color. The dish is ready to wow your guests in less time than it takes to make a cup of coffee.
That's it — you did it. But hold on, I've got a few more tricks that'll take this to another level…
Insider Tricks for Flawless Results
The Temperature Rule Nobody Follows
Many cooks think the pan should stay hot the entire time, but the secret is to lower the heat after the initial sear. This prevents the sauce from burning and keeps the chicken tender. Keep the heat at medium‑low when you add the sauce, allowing it to thicken without scorching.
Why Your Nose Knows Best
Before you taste the sauce, sniff it. A sweet aroma indicates the honey has caramelized; a sharp scent signals the sriracha is potent. If the aroma is flat, let the sauce simmer a bit longer. Your nose is a reliable guide to flavor maturity.
The 5‑Minute Rest That Changes Everything
Let the dish rest for five minutes after cooking. The rest period allows the sauce to thicken and the flavors to settle, giving you a more cohesive taste. This simple step eliminates the rush of plating and ensures each bite is perfectly balanced.
Use a Splash of Water for Reheating
When reheating leftovers, add a tablespoon of water before microwaving or steaming. This prevents the sauce from drying out and keeps the texture silky. The water turns into steam, rehydrating the chicken and veggies.
Keep the Veggies Fresh
Stir‑fry is all about speed. If you pre‑cook the vegetables, they’ll steam and lose their crunch. Cut them just before cooking to preserve that fresh snap.
Serve With a Tangy Side
Pair the dish with a simple cucumber salad dressed in rice vinegar and sesame oil. The acidity cuts through the richness and provides a refreshing contrast.
Make the Sauce Ahead
Mix the honey, sriracha, soy sauce, rice vinegar, and sesame oil in a bowl the night before. Store it in the fridge; the flavors will meld overnight. When you’re ready to cook, just whisk in the cornstarch slurry and stir‑fry.
Creative Twists and Variations
This recipe is a playground. Here are some of my favorite ways to switch things up:
Spicy Peanut Version
Replace the sriracha with peanut butter for a nutty kick. Add crushed peanuts on top for crunch. The sauce becomes a creamy, spicy glaze that pairs beautifully with tofu.
Thai Coconut Twist
Swap the soy sauce for coconut aminos and add a splash of coconut milk. The result is a silky sauce with a subtle coconut flavor. Serve over rice noodles for an authentic Thai feel.
Low‑Calorie Swap
Use a sugar‑free honey alternative and reduce the amount of oil. Substitute the broccoli with spinach or kale for a nutrient boost. The dish remains flavorful while cutting down on calories.
Protein Switch
Replace the chicken with shrimp or thinly sliced beef. Shrimp cooks in 1–2 minutes, giving you a different texture. Beef adds a richer flavor profile and works well with a splash of oyster sauce.
Vegetarian Delight
Omit the chicken and add cubed tofu. Press the tofu to remove excess moisture before frying. The tofu will soak up the sauce and become crispy on the edges.
Gluten‑Free Take
Use tamari instead of soy sauce to keep it gluten‑free. The flavor is similar but with a slightly richer profile. Ensure your cornstarch is certified gluten‑free if you’re sensitive.
Breakfast Edition
Serve the stir‑fry over a bed of scrambled eggs and toast. The sweet‑spicy sauce complements the savory eggs and adds a burst of flavor to your morning.
Storing and Bringing It Back to Life
Fridge Storage
Cool the dish completely before transferring it to an airtight container. Store it in the fridge for up to three days. The sauce will thicken slightly, so add a splash of water or a drizzle of oil when reheating.
Freezer Friendly
Divide the dish into single‑serving portions in freezer bags. Freeze for up to two months. Thaw overnight in the fridge and reheat gently on the stove, adding a little water to restore the sauce’s silky texture.
Best Reheating Method
Use the microwave on medium power for 2 minutes, stirring halfway. Alternatively, reheat on the stovetop over low heat, whisking in a tablespoon of water to prevent the sauce from drying out. The dish should feel warm and slightly glossy.